In this guide I will teach you how to set up an Instagram page for your business from scratch.
Maybe you’re in the process of launching a new business, or you have an existing business and have decided it’s time to set up an Instagram page to get your business noticed. Instagram can feel overwhelming. Where do I begin? How do I grow a following? What type of content should I post? There are a lot of dimensions to it…
But with the proper knowledge and by taking the right steps, you can grow an authentic community around your business with Instagram. I’ve grown my own Instagram account from zero to over 27K followers, and have helped several clients launch Instagram pages for their businesses. Over the past few years, I have developed a process for launching and growing on Instagram, without having to spend any money on ads, bots, followers, likes, etc., so long as you’re dedicated and willing to put in the necessary time and effort.
So let’s jump right in! There are a few things you will want to set up before you even think about trying to gain followers. It is crucial that you have your page ready to go before you invest any time in seeking out your community.
1. Profile Setup
You will want to go to Edit Profile and select a Profile Photo, Name, Username, Website, create a Bio, and Change to Business Account.
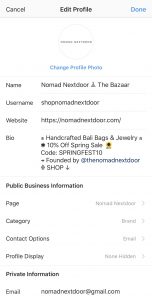
Profile Photo– Choose either your logo or something representative of your business, so that people can easily identify you. This will be the main photo that people recognize you by.
Name– Enter in the name of your business. This will be the headline of your profile. It is different from your username, but can be the same. Ex: Nomad Nextdoor the Bazaar.
Username: This is your Instagram account name, and it is best if your business name can be your username. If your business name is already taken, try and get creative and add a word, abbreviate, or add an underscore or period somewhere in the name. Ex: @shopnomadnextdoor
Website: Enter the link you want to drive traffic to. Ex: website, portfolio, Youtube Channel, blog, email list signup, etc.
Bio: Essentially this is your “About” section. Of course, what you write will depend on your business and goals, but I generally recommend using it to state who you are, something that makes you different, an offering, and a call-to-action.
Business Account: The final thing you will want to do is switch your profile to a business account. The main advantage of doing this is that it gives you access to analytics data, so you can better understand your audience. Also, if you are a product-based business, it allows you to tag your own products in your posts, so users can click on the tag and go straight to the product page on your website. However, in some countries, product tagging is unavailable.
To switch to a business account, scroll to the bottom of the page where you see Switch to Professional Account. Click this and follow the prompts. If you do not already have a Facebook Page for your business, you will need to set one up in order to have access to this feature.
2. Top 9 Photos

The next thing you will want to do is post at least nine photos to your page (before adding anyone on Instagram). Why? Because how can anyone engage with an account that has no content… By adding at least 9 photos, your page will already look more full, more legit, and will give an overall vibe of what your business is about. When posting these photos, it’s also important to keep the aesthetic in mind. You don’t need to be an expert at creating visually pleasing Instagram feeds, but in general you want your photos to flow nicely together. I recommend downloading the free app called UNUM that lets you pre-plan your feed. It integrates the photos you have already posted, and allows you to upload potential photos for future posts that you can rearrange on the grid until your feed looks just right! Refer to A Business’s Guide to Posting on Instagram for a full breakdown.
3. Captions
Now you have your 9 photos ready to go, and are wondering what to write about each one. Your caption completely depends on the nature of your business and what your aims are. For instance, on my travel blogging account @thenomadnextdoor my captions are usually lengthy and heartfelt with the intent to educate and inspire. In contrast, when I post for my shop @shopnomadnextdoor, the captions are usually a sentence or two about a product, the process, etc., with the intent to educate and inform.

It’s important to keep in mind that each post should deliver some sort of value to the consumer. So before posting any piece of content, ask yourself if it does at least one of the following: Educate, Inform, Entertain, or Inspire.
Educate: Solves a problem, answers a question, or teaches something.
Inform: Usually more time-sensitive content that talks informs the consumer about something currently happening. Ex: sale, promotion, news, etc.
Entertain: Evokes an emotion or catches someone’s attention. Ex: memes, interesting photos, humorous content, beautiful imagery, etc.
Inspire: Content that makes the consumer think differently or makes them want to change something. Ex: telling stories, sharing quotes, teaching lessons, etc.
Tip: Involve and engage your audience whenever possible. For instance, ask them to answer a questions in the comments, have them tag a friend, etc.
And of course, the more of these elements you can incorporate into your posts, the better!
4. Hashtags
What are hashtags and why should we use them? Hashtags are essentially a way to categorize your posts and increase your discoverability. How it works is you include a number of hashtags in your post; for instance, if you are posting about handmade jewelry from Bali you might use: #balijewelry #handmadejewelry, and other specific hashtags that are relevant to your post. If someone then searches or discovers that hashtag, and clicks on it, your post may come up and they just might discover that you’re the answer to what they’re looking for!
Now there are a few things to keep in mind when it comes to optimizing your hashtag strategy. You want to use a variety of hashtags, from the lesser-used niche ones, to the mid-sized, and occasionally some of the more popular ones. To see how popular a hashtag is, type it in on Instagram and when it comes up, it will show how many other posts have used that same hashtag. As a rule of thumb, I usually try to target using hashtags with between 10K- 500K posts.
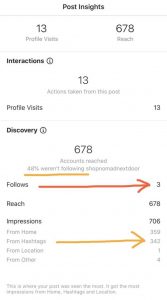
After you’ve posted, you can then see how well you’re ranking with each hashtag by clicking on each one and seeing how close to the top your post is. This will change over time, but if you do manage to secure a top placement for a popular hashtag, you will in turn see a lot of engagement and hopefully attract some new followers. Tip: Check your photo insights a few hours after posting. Below your photo click View Insights, scroll down to Impressions and find From Hashtags listed below it. The number next to it indicates how many people saw your post as a result of your hashtags.
Instagram limits hashtags to 26 per post. I recommend posting them as one block in the comments, as it is less distracting than posting them as part of the caption and makes no difference in the post’s discoverability. It is also important to change up your hashtags each time you post, as Instagram will flag the redundant use of the same hashtags as possible “spam” and may rank it lower in the algorithm, resulting in fewer people seeing your post.
5. Tagging
If you aim to have your photos featured or re-shared on other Instagram Accounts’ pages, then you will want to utilize the account tagging feature. This is especially popular amongst bloggers and photographers. The reason being, is that many of these “feature accounts” have large followings, so if they repost one of your photos, it will give you exposure to a large audience in your niche, and help get your name out there (see example photos below). There are thousands of these types of accounts on Instagram, many of which have a very targeted audience. For instance, in the travel industry there are thousands of accounts that repost content in specific niches such as luxury hotels, solo travellers, travel couples, female travellers, specific destinations, etc. (ie: @dametraveler, @balidaily, @earthpix, @switzerland.hotels) How do these accounts find content to repost? One of the main ways is through hashtags, but if you want to be sure to get your content in front of them, then tag them in your post, as this will show up on their Activity Feed.


Heres how to tag them. When making a post, in the final step you will see a section that says “Tag People”. Click this and then tap on your post and type in the name of the account you want to tag. Instagram allows you to tag a maximum of 20 accounts per post. I recommend that when you finish adding all the tags, you drag all of them over to one corner of the image.
This is so that when a viewer taps the photo, all the hashtags will appear in one place rather than cluttering up the whole photo. Over time, if you continue posting and tagging, you might begin to see some of these accounts reposting your photos to their page, which in turn will bring exposure of your content to a new audience.
6. Location
When posting a photo, you have the option to add a location. This is a great feature to not only let people know where the photo was taken, but also increase your discoverability. For instance, if someone searches “Luzern” under Places, and you’ve posted a photo and selected “Luzern” as the location, your photo may come up in that search.
7. Consistency
Consistency is key. Daily posting would be ideal, as it keeps you top of mind for your audience, but of course, this isn’t always realistic. If you don’t have a constant stream of content, posting daily can be difficult. In my experience, posting 2-5 times per week is perfectly fine. What you want to avoid is inconsistency or going long periods of time without posting anything. For instance, posting daily for one week straight, and then disappearing and posting nothing for the next 3 weeks. This can be confusing to your audience, and also, unfavorable for your ranking in the Instagram algorithm (meaning Instagram will show your post to fewer people). I won’t get into detail with the Instagram algorithm, as it is ever-changing and somewhat illusive, but being consistent is one thing that it favors.
Next steps…
Once you have set up your profile and created your Top 9 Posts, you are ready to start building your community! To learn how to grow an Instagram audience, read How to Grow an Instagram Audience from Zero Followers. If you have any questions feel free to ask in the comments. And best of luck to you on your new venture!


Thank you so much for this corporate insta guidebook! It’s very, very useful!