
Is your Monstera Deliciosa outgrowing its current pot? It is time to consider repotting! Repotting a Monstera is not just about providing additional space; it is crucial for refreshing the soil and promoting healthy growth. Whether you are a beginner or an experienced plant owner, this detailed guide will help you understand when and how to repot your Monstera, what materials you will need, and the best techniques to ensure a smooth transition. Elevate your indoor gardening skills and give your Monstera Deliciosa the care it deserves with our step-by-step repotting guide.
Download my FREE Beginner’s Guide to Monstera Deliciosa Care here.
Before you dive into the details below, be sure to watch my step-by-step video tutorial on repotting your Monstera Deliciosa. This video will show you exactly how to give your plant the fresh start it needs.
Click on the image to watch now! ⬇️
When Does Your Monstera Deliciosa Need Repotting?
Your Monstera Deliciosa is not just a stunning addition to your home; it is a growing, changing organism that requires the occasional update to its living conditions. Understanding when to repot is crucial for maintaining a healthy and vibrant plant. Here are some key signs to watch for:
- Roots are showing: If you see roots peeking out from the drainage holes at the bottom of the pot or spreading across the top of the soil, it’s time for a change.
- Quick to dry out: When your plant dries out rapidly after watering, more than it used to, it likely means the roots have filled the pot and cannot hold much water.
- Stunted growth and dull appearance: If your Monstera’s growth has slowed or the leaves look less vibrant, it could be struggling in its current space.
By repotting your Monstera, you provide it with the space and resources it needs to thrive. This simple step can help rejuvenate an overwhelmed plant and stimulate lush new growth.
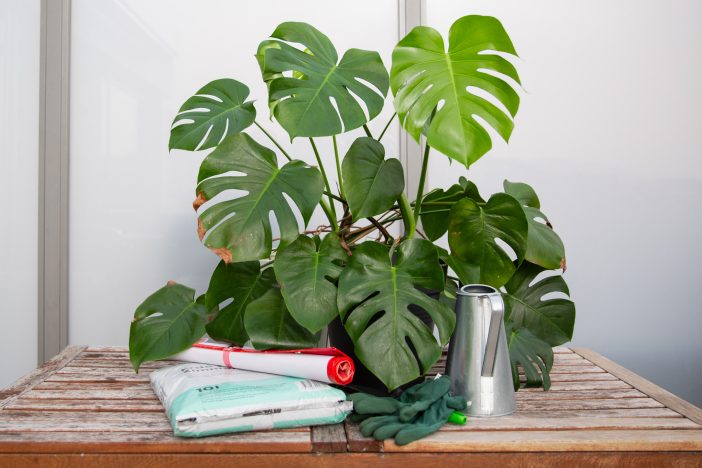
Essential Equipment and Materials for Repotting Your Monstera Deliciosa
Repotting your Monstera Deliciosa is a straightforward process when you have the right tools and materials on hand. Here is what you will need to ensure a smooth repotting experience:
- Gardening gloves: Optional but useful for keeping your hands clean and protected.
- Sterilized pruners: To trim any dead or excessively long roots cleanly.
- A watering can: For watering your plant once it is repotted.
- A suitable pot: Choose a pot that is 5 to 8 centimeters wider than the current one. This allows your Monstera room to grow without being overwhelming. Ensure the pot has drainage holes to prevent waterlogging.
- Moss pole: If your Monstera has long aerial roots, consider using a moss pole in your new pot. This simulates their natural climbing habit and supports vertical growth, which is especially helpful for large plants. Click here to learn more about growth support.
- Soil/Potting mix: Use a high-quality houseplant mix, or create your own blend suitable for aroids like Monstera. A mix of peat moss or coco coir, perlite, and orchid bark works well. This mixture ensures good drainage and aeration, providing the roots with the ideal environment to expand. I use the one from Feey.
Step-by-Step Guide: How to Repot Your Monstera Deliciosa
Step 1: Prepare the New Pot Fill the new pot about one-third full with the fresh potting mix. This creates a supportive base for the roots to grow into. Avoid adding rocks or ceramic shards at the bottom as these can impede drainage instead of improving it.
Step 2: Remove the Monstera From Its Current Pot Carefully tip the Monstera’s current pot sideways and gently ease the plant out. If the plant is very large, you may need assistance to maneuver it safely without damaging the plant or root ball.
Step 3: Inspect and Trim the Root Ball Once your Monstera is out of the pot, inspect the root ball. Use your fingers to gently loosen any tightly bound roots and remove excess old soil. Check for any rotting or dead roots and use sterilized pruners to trim these away. This promotes healthier growth after repotting.
Step 4: Position Your Plant Place your Monstera in the center of the new pot. If you’re using a moss pole, insert it close to the plant stem now, making sure it’s deeply embedded into the potting mix for stability.
Step 5: Add Potting Mix and Settle the Plant Add more potting mix around the root ball, filling in the gaps until the level of the soil is just below the top edge of the pot. Tap down lightly but avoid compacting the soil too much, which could impede water flow and air circulation.
Step 6: Final Adjustments Adjust the position of the moss pole if used, and gently tie the Monstera to the pole with soft ties to support its growth. Place your repotted Monstera in a location where it will receive indirect sunlight and avoid direct sun exposure, which can scorch its leaves.
Step 7: Water Thoroughly Water your Monstera thoroughly until water begins to drain out of the bottom of the pot. This helps settle the soil around the roots and ensures that they are adequately hydrated. Let the excess water drain completely to avoid waterlogging.
Step 8: Post-Repotting Care Give your Monstera a week to adjust before resuming your regular watering schedule. Avoid fertilizing for at least a month to allow the plant to settle in its new environment without the stress of chemical burns from fertilizers.
I hope this guide has provided you with all the steps and insights needed to successfully repot your Monstera Deliciosa. Remember, repotting is a key part of plant care that can greatly enhance your Monstera’s health and growth. By following these simple steps, you will ensure that your Monstera has the best possible environment to thrive in.
For more tips on nurturing your Monstera Deliciosa, be sure to check out my Beginner’s Guide to Monstera Deliciosa Care, packed with essential care tips and advice for thriving plants.
Explore More About Monstera Deliciosa
Also, check out all my other blog posts about Monstera Deliciosa for more insights and tips:
Why the Monstera Deliciosa is the Perfect Plant for Every Home.
How to keep your Monstera Deliciosa alive – basic care for your Monstera
Why your Monstera Deliciosa is dying and how to help.
Boost Your Monstera Deliciosa’s Growth: Simple Techniques for Healthier Plants
Images
- Featured Image: Generated with AI (Midjourney)
- Youtube Thumbnail: taken by me
- Equipment: taken by me


This guide is incredibly helpful! I’m in the process of setting up my new flat, and after reading this, I’m even more eager to get my hands on a Monstera Deliciosa. Thanks for sharing your expertise!
I’m so glad to hear that you found the guide helpful! It sounds exciting to be setting up your new flat with such a beautiful plant. If you have any more questions as you get started with your Monstera Deliciosa, feel free to reach out. Happy planting, and thank you for your kind words! ?
Anja, your guide on repotting Monstera Deliciosa is incredibly thorough and useful, especially the video! I’ve been nervous about the process, but your step-by-step approach makes it feel much more manageable ??