Embarking on the journey of wine degustation is like unlocking a world of sensory delights. For beginners, it’s a fascinating exploration of flavors, aromas, and textures and should bring you joy and pleasure. When tasting, the focus is on your preferences and the sensory memories the wine evokes for you. So that you can discover your new favorite wine at the next wine tasting and impress your friends with knowledge, I’ve summarized the most important steps for you in the video and the blog below:
? How to Taste Wine with Chloé
Overview
?Preparation and Tools
?Hold The Glass Correctly
?Pouring
?Look with the Eye
?Smell with the Nose
?Taste with the Mouth
?Evaluation
Preparation and Tools: Choosing the Right Wine Glass
The preparation for a successful wine tasting begins with selecting the right wine glass. A suitable glass allows the aromas to unfold optimally and enhances the tasting experience. Below you can see an overview of what kind of glass to choose for which wine:
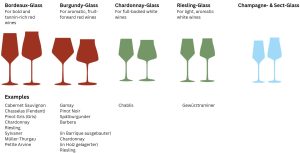
It’s further advisable to provide tap water to cleanse the palate between tastings. Ideally, the tasting should take place late in the late morning when the palate is still neutral and concentration is at its peak. It’s also important to ensure that there are no strong odors in the surroundings during the tasting, as they could impair the sense of taste. Another important aspect is deciding whether to eat during the tasting. Typically, tastings are conducted without food as meals can alter the taste of the wine.
If you want to learn more about the different types of wine glasses, click here.
Hold the glass correctly
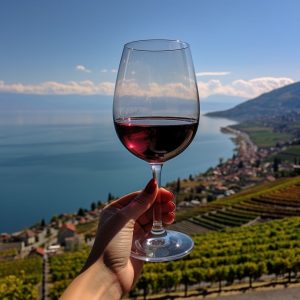
Properly holding the wine glass is crucial for a successful tasting experience. Always hold the glass by the stem to prevent your body heat from affecting the wine’s temperature and alter its aromas. It further ensures that the wine remains at the ideal temperature, allowing you to better observe its color and consistency while savoring its aromas.
Pouring
Look – with the eye

Begin by holding the filled wine glass up to the light. Now you can assess whether the wine is clear or cloudy. With your eyes, you can also determine if the surface reflects. If it doesn’t, it could indicate a flaw in the wine. Lower the glass and observe the colour. For this, it’s best to view against a white background (e.g., a white tablecloth). Now, describe the color of the wine:
As a guideline:
- White wines start with a pale yellow hue (often with hints of gray or green), indicating that the wine is relatively young. Good white wines can progress to a golden yellow shade, often a sign of a mature, dry white wine or a noble sweet wine.
Caution: Once white wine shows brown hues, it suggests that the wine is no longer at its ideal taste. - Rosé wines begin with a grayish pink tone (young, simple rosé wines). They can progress to salmon tones, indicating that the rosé has been lightly aged.
- Red wines start with a vibrant cherry red color (young wines). Once the red hues develop some orange undertones, it indicates that the red wine is ready to drink.
Caution: Copper tones in red wines are often a sign of an overripe wine.
Describe not only the colour but also its intensity (pale, delicate, deep, etc.).
Smell – the nose
The nose is the most important sensory organ in wine tasting. With smelling, you can make statements about the aroma (from fruity to floral to animalistic, etc.), grape character, as well as intensity and complexity.

Taste – with the mouth
Now you can take the first sip. Make sure to slurp lightly. Oxygen helps to perceive the taste of the wine better. Also important is that you keep the wine on your tongue for about 10 seconds. On the tongue, strictly speaking, we can only taste sweet, sour, bitter, salty, and umami. After the 10 seconds, it is advised to spit the wine out in order to be able to taste and evaluate the structure of the wine better. By spitting, you will be able to feel more of the wine on your palate, like recognising the smooth, velvety tannins, or understanding a wine’s acidity and overall mouthfeel. Tannins – the mouth feels rough or dry.
Evaluation
After the tasting comes the evaluation of the wine. This involves an overall assessment of the wine. You attribute a basic character to the wine. For the overall judgment, you can use adjectives such as rustic, robust, powerful, gentle, subtle, and charming. Your imagination knows no bounds.
Short summary – you should talk about the following elements during a wine tasting:
- Visual elements
- Impression on the nose
- Impression on the palate
- Overall impression
If ever you need inspiration on how to describe a wine, check out Vivino (Switzerland) – Buy the Right Wine and see how others did it!
Eager for more insights into Swiss Wine? Follow me on Instagram for a behind-the-scenes look at the vibrant world of Swiss viticulture! ![]()
Pictures: Generated by Midjourney & by myself on Canva (the wine glasses)
Information Sources: Myself, WSET Level 1 handbook

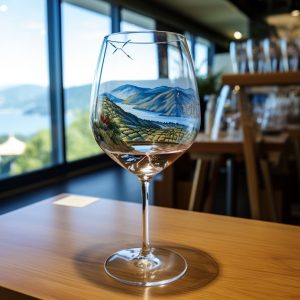 Typically, a small pour—about 30 to 60 milliliters (or 3 to 6 centiliters)—is sufficient for each tasting.It’s advisable to take small sips to fully appreciate the taste and aromas without overwhelming the palate. By limiting the amount, you can focus on the subtleties of the wine and better perceive its various nuances. Remember that quality prevails over quantity, so enjoy the wine in moderation to fully savor the tasting experience.


Thank you for this beginner’s guide! Can’t wait to do the next wine tasting.
Hi Corinne 🙂 I’m so excited and hope your next wine tasting will happen soon and you can shine with all your new knowledge! If you need any more information, let me know 🙂 Cheers, Chloé
Hi Chloé
That sounds pretty awesome! i like how you prepared a small video step by step thats so cool!
Do you have any wine recommendations in general? That would be very nice, im looking forward to your next blog!
Cya
-M
Hi Marco
Thanks so much for your lovely feedback! 🙂 I’m really happy you liked the video!
In general, do you know “Zürcher Staatsschreiber” or “Zürich AOC Stauffacher Federweisser”? They are fantastic white wines. A MUST-TRY.
Cheers,
Chloé
The best wine blog out there! Informative, visually stunning and super interesting! Can’t wait for more posts 🙂
Thank you so much, I am so happy to read that you learned a lot reading my blog! Stay tuned for Blog 3! 🙂 Cheers and have a great evening!
you have to teach me how to do it, love your blogs!
Absolutely! What wine do you like most – red, white or rosé? Cheers, Chloé