Studio Game 2 | Mattia | Week 1
Introduction
Studio Game 2 has finally begun! Already in advance I had many ideas on what I could do in those 8 weeks! So in this past first week, the focus was on finding a good idea, defining the scope of it, and planning the entire project. Since I already had so many ideas on what I could do, the difficult part now was not to find an idea, but to abandon many others.
Each idea included some sort of procedural mesh generation. But the idea I liked most since the beginning was to make some sort of random planet generator with different biomes etc. And that’s also the idea that stuck at the end.
In a first step I started looking into different kinds of algorithms that could be used to create procedural meshes. The two main ones I looked into were the Marching Cubes Algorithm and the Wave Function Collapse Algorithm.
Wave Function Collapse Algorithm
The Wave Function Collapse Algorithm has one major flaw for me, and that is the fact that it needs a set of pre-made tiles. This would mean that I would have to create 3D tile sets by hand, and then the final mesh/object/planet can only consist of variations from those tiles. While this for sure has its use cases, this was not what I was looking for.
Marching Cubes Algorithm
So what makes the Marching Cubes Algorithm better in my opinion? Well, it does not need any tiles that are pre-made, it can be done completely in code, it can be optimised by calculating the mesh on the GPU using Compute Shaders and by introducing a second optimisation, the Octree Spacial Partitioning, this basically allows the mesh to have different LODs.
How it works
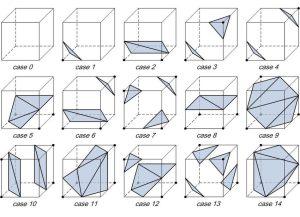
The marching cubes algorithm explained as simple as possible is basically just a 3D grid of points. Each point is either inside the mesh/object or outside of it. This can be represented with a simple boolean. Once the gird is created and all the points have their boolean set, we can take a cube, this cube is defined by 8 corners. Each corner is represented by one of the points form the gird. Each corner of this cube can now be in- or outside of the mesh, this means we have 2^8 (256) different possibilities how that cube can look. Of course many of those configurations are just mirrored or rotated images of other configurations.
Each configuration has its own way of representing a mesh by connecting different edges of the cube with triangles. All those 256 configurations with their associated triangles can be stored in lookup tables. The ones I will be using can be found here.
After the cube is done calculating or rather looking up the mesh it needs to create, it will simply move on, go to the next point, and do the same routine again. This goes on until the entire grid is done, and the finished mesh can be created.
My goal will be to generate random planets, that can be huge, but thanks to the Octree I can have different LODs depending on how close the camera will be to the mesh. I will simply adjust the grid size for the marching cube to have a higher/lower resolution. This combined with it running via compute shaders on the GPU should in theory allow me to achieve an acceptable frame rate. But those are all just speculations and wishes… Only time will tell if it really works!
Planning and setting up
After I decided on what I want to do, I went on and created a Notion-Page to collect all my ideas and thoughts. While I was doing that, I also thought about maybe enhancing it all later with shader materials, maybe a custom atmosphere shader, and even a sea-level. But I will have to see how far I can get in those next 7 weeks.
With those plans, I went ahead and created a Kanban Board with all my tasks. This means I’m now ready to start working on those tasks next week.
I then created a new Unity project with the URP render pipeline so I can manage rendering performance better and also create shaders with shader-graph. I created a GitHub repo and I also decided to give Github Copilot a shot and see how it works with unity specific C# code.
So with the planning done, the project set up, and an AI ready to help me write code, I’m ready and excited to start working on this project next week!